Web Deploy Publish Fails Because a File is Locked or In Use
This article shows you how to fix a Web Deploy publish that fails because a file on the web server, usually a DLL, is locked or in use. It applies to ASP.NET and .NET Core websites published with Web Deploy from Visual Studio, GitHub or the command line.
When this happens the publish stops with an error similar to one of these:
|
|
|
|
Web Deploy cannot modify the file 'YourApplication.dll' on the destination because it is locked by an external process.
ERROR_FILE_IN_USE
The process cannot access the file because it is being used by another process. |
|
|
|
|
The reason is that your website is running. While it runs, the web server has your application files open in memory, which locks them, so Web Deploy can not overwrite them with the new versions. Nothing is wrong with your website or with Web Deploy, the application just needs to be stopped while the new files are published.
Restarting the Application Pool does not fix this. After a restart the website starts again on the next visit and locks the files again before your publish runs. The application has to stay stopped until the publish has finished.
There are two ways to do this.
Method 1: Let Web Deploy take the application offline
Web Deploy can take your application offline for you at the start of each publish and bring it back at the end. You set this once in your project and every publish after that looks after itself.
In Visual Studio, open your publish profile. This is the .pubxml file in the Properties\PublishProfiles folder of your project. Find the PropertyGroup section and add the following setting to it:
|
|
|
|
<EnableMSDeployAppOffline>true</EnableMSDeployAppOffline> |
|
|
|
|
Once completed your publish profile should look something similar to the example below:
|
|
|
|
<PropertyGroup>
<WebPublishMethod>MSDeploy</WebPublishMethod>
<EnableMSDeployAppOffline>true</EnableMSDeployAppOffline>
.......
</PropertyGroup> |
|
|
|
|
If you publish from the command line or from GitHub using msbuild or dotnet, add the same setting to the command:
|
|
|
|
/p:EnableMSDeployAppOffline=true |
|
|
|
|
If you call msdeploy directly, add the following to the command:
With this setting, Web Deploy places a file named app_offline.htm in your website at the start of the publish. This tells the web server to stop your application and release its files. When the publish has finished Web Deploy removes the file and your website starts again on the next visit.
Two things to be aware of:
1. The application can take a few seconds to release its files, so now and then a publish may still fail on a locked file. Publish again, and if it keeps failing use Method 2 below.
2. If a publish fails part way through, the app_offline.htm file can be left behind and your website will stay offline. If your website does not come back after a failed publish, delete app_offline.htm from your website's public_html folder using FTP or the Control Panel File Manager.
Method 2: Stop the Application Pool, publish, then start it again
This method always works, as your application is fully stopped before you publish. Your website will be offline from when you stop the Application Pool until you start it again, so remember the last step.
1. Log into your Hosting Control Panel.
2. Click the Web Sites icon option
3. Click on the website name that you are publishing to, to enter the website properties
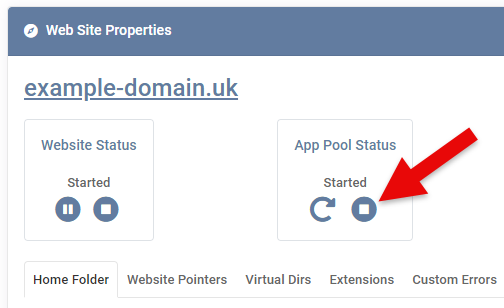
4. In the website properties click the App Pool Status Stop Icon and wait for the Application Pool to stop, which can take up to 60 seconds
5. Publish your website using Web Deploy
6. Once the publish has finished, start your website again by clicking the App Pool Status Start Icon
Related articles
How to Enable Web Deploy
Publishing your Application using Web Deploy
How to Restart Your Website Application Pool
Back To Hosting Knowledgebase Menu |